Aug 2, 2011

The Big 1

Is this the cutest munchkin-face you've ever seen??? I had a fun-filled weekend living it up for my baby nephew's 1st birthday. I can't believe a year ago we were visiting my sister at the hospital while trying to figure out how to hold a real live newborn for the first time. (I never had much practice with babies before what.so.ever.) He's been the perfect addition to the happiest year of my life! :)

We spent the birthday weekend soaking up the sun at Marco Island and stayed at the Marco Beach Ocean Resort where we had a little Dr. Seuss themed party for the birthday boy with our family. (He actually had 2 parties--this is the one at his grandparents' house!)


Note to self: Some babies are NOT fond of smash cakes!

Happy birthday squishy-face! Your tia loves you!

Jul 27, 2011

RugRat Update

Here's the Tarjay winner laying on my living room floor! Ha, I tricked ya! I didn't choose any of the ones in my previous rug board. (Please excuse all the wrinkles, it needs more time to learn to lay flat).


This purchase was not at the top of my super long priority list but I couldn't pass up the offer! I found so many great area rugs on Tarjay's site but this one caught my eye and I thought it would be perfect for this space. At 15% off and free shipping, I jumped at the deal. {Did you know that rugs are really freaking expensive?} Unfortunately, I don't know diddly-squat about rugs. Apparently there are lots of things to consider when buying one: Is it hand knotted, hand tufted, flat weave, low pile, naturally or syntheticly dyed? Obviously, I didn't care about any of that because I think this one is actually a patio rug! Oh well. All I knew is that I wanted to stick to the same color scheme but mix up the patterns with a bold geometric look against the pillows.


The pictures are confusing. The rug is a light beige with a teal green pattern and the size is about 5' x 7'. This room is not even close to being finished, but this rug was a fun addition to the space.

Jul 25, 2011

Gallery Walls

Jonesing for some personalization in our home these days. The only photos that we’ve put up in frames are about 3 wedding shots and a couple of cute pics of our nephew. The other frames still display a bunch of those strangers in weird poses and I keep getting asked who those foreign family members are. It’s about time I fill those up with pics of real people we know!

Thankfully, I have a huge empty wall in the family room that would serve as the perfect gallery wall. I’ve been looking for ideas and there are so many ways to showcase a gallery wall to make it the main focus of a room. I can’t decide on the style I want to go for but one thing I do know is that I want the photos to be large in scale and consisting of our own pictures of the places we’ve visited together. Kinda sappy, I know…but this should be a conversation starter while also telling a story on its own. So clever. :)

So, I’ve categorized gallery walls into 3 different styles. Maybe if I walk through it on here with you, it will help me decide.

Neat & Orderly: Better option for the anal retentive who gets creeped out by lines that don’t match up and colors that aren’t exactly the same. Everything is aligned perfectly and photos also all have the same look.


Organized Chaos: Exact opposite of the Neat & Orderly. Frames don’t match up but colors and mats complement each other nicely. Usually mixing art and photos, and frames are different sizes and shapes but yet still fit like a puzzle.


Scattered but Consistent: A mix of the two styles. Frames can be different sizes and shapes but everything is aligned and even.


Ok, that worked! I think I got it! Since I like all of the looks so much, I will try out a couple of styles on two separate areas in my house! For the family room I will shoot for the Neat & Orderly in a large scale with black frames and white mats. For the wall by the stairs I will go with the Scattered but Consistent look using different frames in different sizes. I don’t want to go gallery-wall-overboard so I want to keep this as minimal, clean and neat as possible. Time to dig up the photos!

All photos via here, here, Domino, here, and here.

Jul 21, 2011

RugRat

I love rugs! Small kitchen rugs, patio rugs, but especially area rugs! They pull the room together and complete the look. I've been doing lots of research and it looks like rugs are used in every room of a home, even the homes that have beautiful hardwood floors. But how do they do it? Area rugs can cost a fortune--sometimes as much as a mortgage payment! After looking at a few websites with cheaper alternatives, I realized Tarjay really does have great looks at affordable prices! Here are some of my faves, all at about $150 or less! Click on the image for a closer look.

I jumped the gun and purchased one. I took advantage of the special going on now and got it at 15% off with free shipping! The price will never compare to any others. Once I receive it, I'll show you how it looks. Stay tuned...!

Jul 18, 2011

Productive Weekend

Wow, what a weekend. Cleaning, upkeeping, installing, building, drilling...all jam-packed into 2 days! We had a few good weekends off from housework but had to hit up the to-do list that kept building up. The new peephole was installed {can you believe we didn't have one?!}, my beautiful mirror was hung up {more on that to come soon}, and we deep-cleaned the heck out of the place for 5. Whole. Hours.

Then, the list tripled! Hubby had a dream that I made him take me to Ikea and I thought it was a GREAT IDEA! I took my 'Things to Get at Ikea' list {I have a list for everything} and didn't waste any time. As much as I love getting a good deal there, I really detest the drive, the mobs, and the ginormous receipt I end up with because I can't control myself. This time I beat the system. Ha!  

1. Expedit bookcase: I've been wanting a bookcase since before I moved in so that I can showcase a fun display. I decided on the Expedit because I wanted something cheap to be able to hack. We'll see how that goes...
2. Minut light: We have a bedroom that is just used for storage for right now. We had ripped off the fugly ceiling fan when we moved in but then realized that the light went with it. We wanted something simple to serve the purpose and this one was our best bet.
3. Kajsa curtains: I've gone to Ikea about 5 times in the last 3 months and have never come across these curtains. We have a very long pair of sliding glass doors in our home office and Ikea seemed to be the only place I was able to find an afforable alternative with a cool design at the length I needed. Perfect!
4. Fejka artificial plants: Stocked up on 3 artificial plants to spruce up some lonely bathroom vases.
5. Torka dried bouquet: These are for my beautiful floor vase given to us as a housewarming gift.
5. Lack shelves: Turns out they're too wide for the place I want to put them. So back to Ikea I go...dammit!


Jul 15, 2011

Sweet & Salty Salmon Recipe

Deeeelish! My cousin loves to cook. I want to love to cook. I've been trying to get a little creative in the kitchen lately and I asked her to send me some of her favorite recipes for a lil inspiration. This one was just up my alley.

Sweet & Salty Salmon

Ingredients
  • 1 lb. salmon fillets
  • 1/3 cup brown sugar, divided {I used light brown sugar}
  • 1 tsp. lemon pepper, divided
  • 1 tsp. garlic powder divided
  • 1/3 cup low sodium soy sauce
  • 1 tbsp olive oil
  • 1 1-inch piece fresh ginger root, minced {I didn't use this and it was perfectly awesome without it}
  • 1/3 cup orange juice
Prep for Marinade
Rub salmon with about 1 tbsp of brown sugar. Lightly sprinkle with lemon pepper and garlic powder; rub seasoning into fish.

Into a small saucepan set over medium heat, pour soy sauce and olive oil. Stir in ginger and remaining brown sugar, lemon pepper, and garlic powder. Bring to a gentle simmer, stirring constantly until sugar has dissolved. Remove from heat, stir in orange juice.

Place fish and marinade into a resealable plastic bag, seal, and refrigerate overnight, or for at least 3 hours.

Time for the Real Deal
Preheat broiler. Place fish in a foil-lined baking pan. Reserve marinade.

Broil fish 4 minutes. Remove from oven and baste with marinade. Return to oven and broil 2 more minutes. Turn fish and broil until fish flakes easily, about 4 more minutes. {I had to do an additional 4 minutes} Remove from oven and let sit for 5 minutes before serving.

Serve with brown rice and steamed broccoli...and wine of course!

Thanks Artie :)

Jul 14, 2011

I found my new Martha

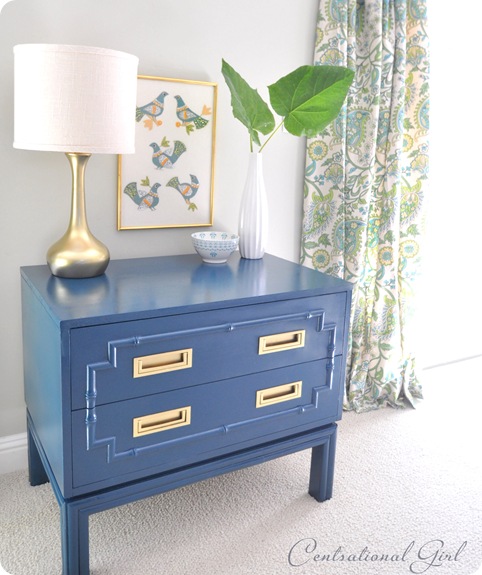
UGH! I'm so jealous of all these furniture refurbishers who are able to create a kick-ass piece of hidden awesomeness for just a few bucks. But SHE is my #1 favorite. She is...even better than Martha Stewart! {omg, did I just say that!} Check out the latest masterpiece she refurbished from an old, broken bamboo dresser she scored at a thrift store for just $25! I love that there's a possibility that there could be some history to this piece because of its age and it makes me daydream about where this little dresser was probably sitting and who owned it in its heyday. {...still daydreaming...} Anyway, a little peacock color paint and some lovin' turned into the most fab dresser I've ever laid my eyeballs on.


It still has its vintage feel but with just a brand new make-over. {my fave!}

I would love to see if maybe I can pull something like this off. But I've got 3 big problems:
#1. There are no real vintage furniture thrift stores in Miami {damn this young city!}
#2. I've never done anything like this in my life and I don't think I have the knowledge, patience, or cojones
#3. I'm a clutz. period.